Integrating Dayforce HCM with Compt (Company Administrators)
Setting up the Dayforce HCM + Compt API Integration
Once you have determined that you would like to set up the Dayforce HCM Integration, reach out to your Customer Success Manager or support@compt.io to enable the Dayforce HCM Integration feature for your company. After the feature has been added by the Compt Customer Success team, follow the steps below:
To authenticate Dayforce HCM (formerly Ceridian Dayforce HCM) using your credentials, you will need to provide the following information:
- Company ID
- Credentials
Please ensure that you update the Role that you are configuring for the integration to be the Default role. To change a Role to become your Default, go to System Admin > User. Find the User you want to update (this would likely be your own User), click on the User and select the "Is Default" checkbox to the Role that you will be configuring for this integration.
Step 1: Configure Feature Access
- From the hamburger button in the top left of your screen, click on System Admin > Roles

- Navigate to Features. Ensure HCM Anywhere and Web Services are checked.

- Expand Web Services and make sure that Read Data is checked. If you need to PATCH/POST data you will need the associated checkboxes marked as well.

Step 2: Configure Authorizations
-
Navigate to Authorizations
Select Can Read for the following (depending on your use case):
- Employee Contact Information
- Employee Contact Information - Business
- Employee Contact Information - Personal
- Employee Financial Information
- Employee Key Information
- Employee Historic Pay Information
- Employee Pay Information
- Employee Personal Information
- Employee Personal Information XrefCode
- Employee Profile – Security Settings – Role
- Employee Properties *for custom fields*
- Employee Status Information
- Employee Work Assignment – Primary Records
- Employee Work Assignment – Secondary Records
- User Information
Step 3: Configure Web Services Field-level Access
- Navigate to Web Services Field-level Access
-
Navigate to the RESTful Services -> Human Resources -> Employee
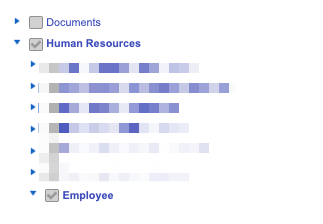
-
Enable EffectiveStart, EffectiveEnd, and XRefCode
- Then, make the below updates:
- Enable FirstName and LastName and CommonName
- Right-click Employee managers and Select All
- Right-click Employment Statuses and Select All
- Right-click Employment Status Group and Select All
- Enable RESTful Services > Human Resources > EmployeeWorkAssignment (and all child nodes)
- Enable Contacts and Addresses (and all child nodes) under RESTful Services > Human Resources
- If you are creating a Birthday Bonus stipend, Enable BirthDate
- Enable StartDate and HireDate and OriginalHireDate
- Enable RESTful Services > Configuration > Location (and all child nodes) AND RESTful Services > Human Resources > OrgUnitInfos
- If you need Custom Fields (employee properties), Enable RESTful Services > Human Resources > EmployeePropertyValue

Step 4: Configure Org-Level Access
-
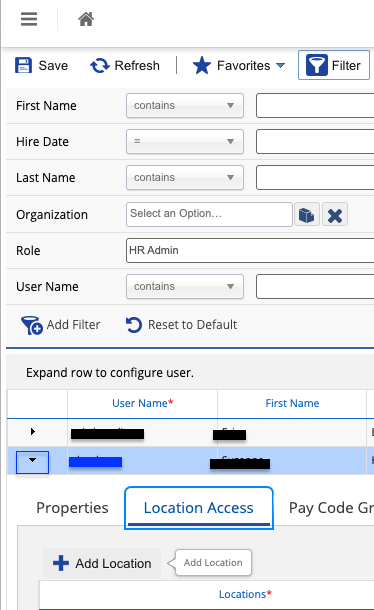
Navigate to System Admin > User. Please note, the user authenticating will need "Can See Self" enabled
- Expand the User by clicking on the small down arrow as shown in the blue box below. Click on Location Access, + Add Location, and add the Company Level Location
Step 5: Authenticate your credentials in Compt
-
Access your Compt account (have your Dayforce Company ID, User Name, and Password available).
- Click the Stipend Admin & Company Settings Tabs.

- Scroll down to Employee Sync Integration & click Set up Integration.

- Scroll down the list of available integrations (or use the search box) to select Dayforce.

- Confirm that you are an Admin for Dayforce.
- Select that you are connecting Production data.

- Enter your Company ID and click Next.

- Then, enter your User ID and Password and click Submit.

Please note: When mapping fields, make sure any groups synced from your HRIS that determine stipend eligibility exactly match the group names in Compt—including case sensitivity and spacing. Mismatches can impact stipend funding. To avoid issues, connect with your CSM or support@compt.io before finalizing your field mapping.
Step 6: Confirm the sync
Once the credentials have been entered, you will see an option in Compt to trigger the employee sync.
It can take up to 30 minutes for the sync to be complete so make sure to check back that all of the information has been successfully transferred.