Compt: How To Submit Business Expenses - Employees
Employees can use Business Expenses in Compt to create, save, edit, and submit expense reports for approval. A Business Expense report groups one or more work-related expenses into a single submission so they can be reviewed by the appropriate approvers.
Before submitting a report, Employees can add expenses, save the report as a draft, and make changes as needed. After the report is submitted, the expenses in that report can no longer be edited.
OVERVIEW
Compt is a platform employers use to manage stipends, reimbursements, and Business Expense programs for Employees. Business Expenses are work-related expenses submitted through Compt for reimbursement or recordkeeping.
A Business Expense report is a group of one or more expenses submitted together for review. Depending on your company’s approval workflow, your report may be reviewed by a manager, a finance reviewer, or both.
WHEN TO USE
Use this process when you need to:
- Submit work-related expenses for reimbursement
- Submit work-related expenses for recordkeeping
- Create a Business Expense report
- Add expenses to a report before submitting it for approval
- Save a Business Expense report as a draft
BEFORE YOU START
Before creating a Business Expense report, make sure you have:
- Access to Business Expenses in Compt
- A clear title for the report
- A description that explains what the expenses are for
- Any required receipts or supporting documentation
- The details needed for the expense type you are submitting, such as amount, mileage, or trip information
Receipts must show vendor, date, and total.
VIDEO
This interactive demo shows the employee experience for creating an expense report and submitting expenses for reimbursement, walking through each step from start to finish.
HOW TO
To create and submit a Business Expense report:
- Log into Compt.
- Click Business Expenses in the left-hand sidebar.
- Click New Expense Report.
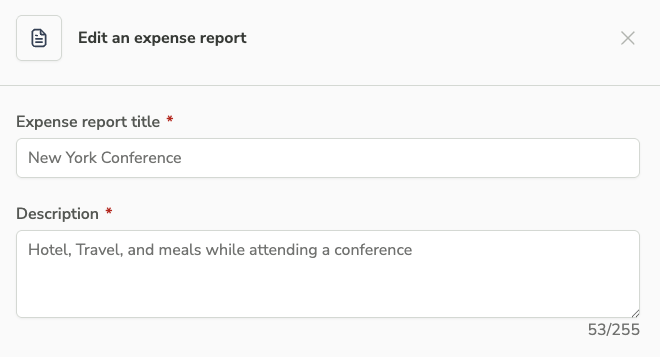
- Enter an Expense Report Title.
- Enter a Description that explains what the expenses are for.
- Click Create.
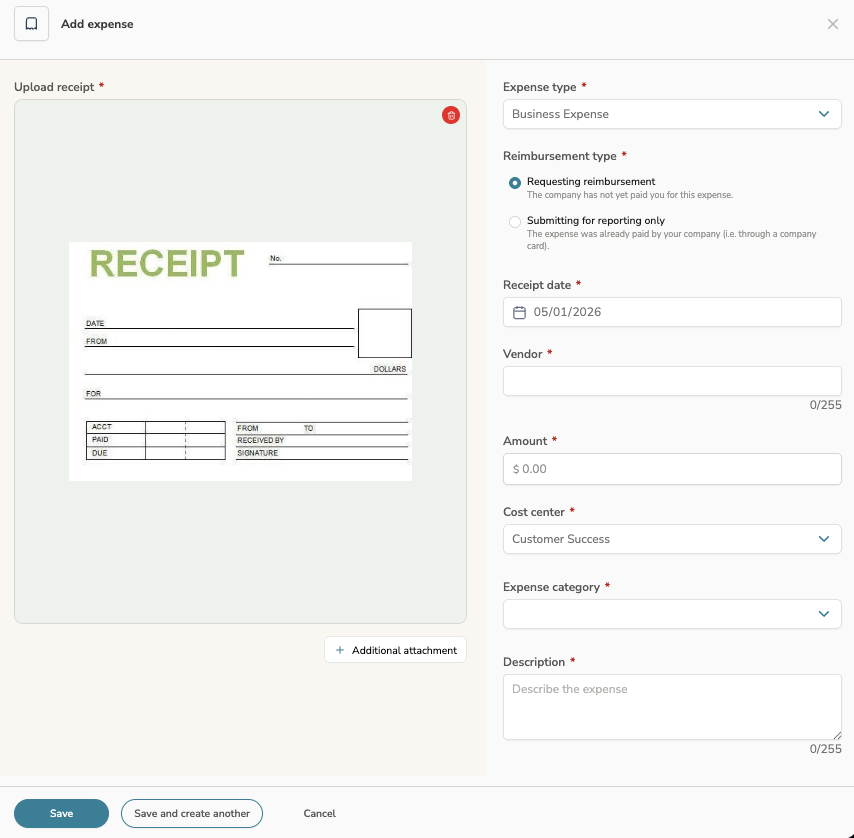
- Click Add Expense.
- Select the correct expense type.
- Complete all required fields for the expense type you selected.
- Upload any required supporting documentation.
- Enter a clear description for the expense so reviewers understand the business purpose.
- In the Reimbursement Type field, choose whether the expense should be reimbursed or reported only.
- Select the reimbursement option if you are requesting payment back through payroll.
- Select the reported-only option if the expense was already paid by your company through another method, such as a company card.
- Click Save to return to the expense report details screen.
- If you need to add another expense to the same report, click Save and create another.
- Repeat the process until all expenses have been added to the report.
- Review the report details screen to confirm all expenses are correct.
- Edit or delete individual expenses if needed before submitting.
- Click Options if you need to edit the report title, edit the report description, save the report as a draft, or delete the report.
- Click Submit for approval when the report is ready for review.
Expense types may include:
- Business Expense: Use this option for a standard single expense, such as a client meal, software subscription, office supplies, or rideshare trip.
- Mileage: Use this option to submit mileage for a work-related trip. Enter the number of miles traveled. Compt automatically calculates the reimbursement amount based on your company’s mileage rate.
- Per Diem: Use this option when your company provides a daily allowance for travel. Compt calculates the reimbursement amount based on your company’s per diem policy and the number of days entered.
WHAT HAPPENS NEXT
After submission, the Business Expense report is routed for review based on your company’s approval workflow. Your report may be reviewed by a manager, a finance reviewer, or both.
As the report moves through review, the expense status updates in Compt. Once the report is fully approved, the status changes to Processed.
Reimbursement is processed through payroll. For exact timing, Employees should check the FAQ tab in Compt for company-specific details.
TROUBLESHOOTING
If you cannot edit your Business Expense report:
- Confirm whether the report has already been submitted
- Expenses in a submitted report can no longer be edited
- Review the report carefully before clicking Submit for approval
If you need to change a saved report:
- Confirm the report is still in draft status
- Open the report
- Update the expenses as needed
- Use Options to edit the title or description
If you are not sure which reimbursement type to select:
- Choose the reimbursement option if you are requesting payment back through payroll
- Choose the reported-only option if the expense was already paid through another company payment method
If your mileage reimbursement amount is not entered manually:
- This is expected
- Mileage reimbursement is calculated automatically based on your company’s mileage rate
FAQS
Q: Can I save a Business Expense report before submitting it?
A: Yes. You can save the report as a draft and return to it later before submitting it for approval.
Q: Can I edit an expense after I submit the report?
A: No. Once a Business Expense report has been submitted, the expenses in that report can no longer be edited.
Q: Can I delete an expense before submitting the report?
A: Yes. While the report is still editable, you can delete individual expenses from the report details screen.
Q: Who reviews my Business Expense report?
A: Your company’s approval workflow determines who reviews the report. This may include a manager, a finance reviewer, or both.
Q: What is the difference between reimbursed and reported-only expenses?
A: A reimbursed expense is submitted for payment back through payroll. A reported-only expense records an expense that was already paid by your company through another method, such as a company card.
Q: When will I be reimbursed?
A: Reimbursement is processed through payroll. For exact timing, Employees should check the FAQs tab in Compt for company-specific details.