Compt: How to Integrate ADP Workforce Now with Compt – Admins
The ADP Workforce Now integration with Compt enables automatic syncing of your team list and payroll data, helping ensure employee records stay accurate and up to date across both systems without manual updates.
This guide walks through how to:
- Enable the ADP Workforce Now (WFN) integration in Compt
- Subscribe to the Compt Connector in the ADP Marketplace
- Updating Employee Eligibility to Exclude Employees from Syncing to Compt (Optional)
- Finalize the Integration in Compt & Setup Field Mapping
- Configure Payroll Pay Codes (Required for Payroll Push)
- Push Payroll from Compt to ADP Workforce Now
Step 1: Enable the ADP Workforce Now Integration in Compt
Before you can connect Compt to ADP, the integration must be enabled on your Compt account.
- Contact your Customer Success Manager or email support@compt.io to request access to the ADP Workforce Now integration.
- Once enabled by the Compt team, log in to Compt and navigate to: Stipend Admin → Company Settings
- Scroll to the ADP Settings section.
- Copy your company’s unique Compt token.
- Click Set up ADP integration.
- This will redirect you to the Compt Connector for ADP Workforce Now in the ADP Marketplace.
- You can also access the connector directly from the ADP Marketplace.

Step 2: Subscribe to the Compt Connector in the ADP Marketplace
-
On the connector page, click Buy Now.

- Click Continue on the Create Order page.
- On the Additional Information page:
-
Paste the company token you copied from Compt

- Be sure to use your token (not the example shown in ADP screenshots)
- Click Continue.
- Enter your billing information and continue.
- Review and accept the ADP Marketplace Terms of Service.
-
Click Place Order to complete the subscription.


Step 3 (Optional): Updating Employee Eligibility to Exclude Employees from Syncing to Compt
If there are employees in ADP Workforce Now who should not be synced into Compt, you can manage this by adding an eligibility field in ADP and using it to control who syncs.
Create the Eligibility Field in ADP Workforce Now
- In ADP Workforce Now, navigate to: Setup → Tools → Custom Fields
- Click Add.
- In Field Name – English (US), enter exactly one of the following (based on the functionality you'll use in Compt):
- Business Expense Eligible→ Use only if you are using Compt Business Expenses
-
Stipends Eligible→ Use only if you are using Compt Stipends
Please note: You do not need to create both fields unless you are using both features.
- Leave French (CA) and Spanish (US) blank.
- Set Field Type to Yes/No Buttons.
- Set Location to Employment Custom Fields.
- Leave all remaining fields at their default values.
- Click Done to save.
Set Employee Eligibility in ADP
- Set the eligibility field to Yes for employees who should sync into Compt.
- Set the field to No for employees who should be excluded from syncing.
If you need assistance mapping Compt eligibility based on a specific criteria (such as employment status or another grouping setup in ADP) reach out to your Customer Success Manager or email support@compt.io, and our team will be happy to help.
Step 4: Finalize the Integration in Compt & Setup Field Mapping
Once the connector is installed, return to your Compt account to complete setup.
- In Compt, go to: Stipend Admin → Company Settings → ADP Settings
-
Click on Finish Authorization Process to grant consent to Compt so that your employees can be synced. This will take you to the authorization flow in ADP and will return you back to Compt.
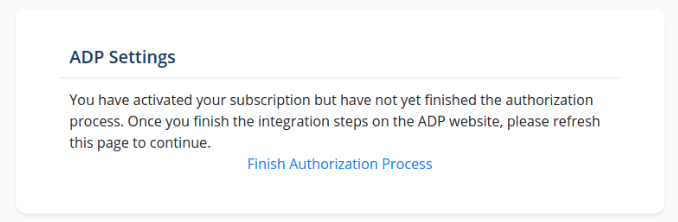
- After you finish the authorization flow you will see the following in Compt:


- Click Edit API Field Mapping. Select which ADP fields you’d like to sync to your Compt Team List.
- These are commonly used for eligibility, reporting, and payroll logic.
-
If you need a field that doesn’t exist yet, contact support@compt.io to request a custom field.

- Save your selections. Either:
- Trigger a manual sync by clicking Sync Employees from ADP , or
- Wait for the automatic sync (runs daily)
- You can monitor sync status directly in the ADP Settings section on the Company Settings page in Compt.
- Once the sync runs, you can view the employee information pulled from ADP in Compt by going to Stipend Admin → Team.

Step 5: Configure Payroll Pay Codes (Required for Payroll Push)
To push payroll data from Compt to ADP Workforce Now, you’ll need two ADP pay codes:
- One taxable pay code
-
One non-taxable pay code
Set up pay code mapping
-
In Compt, go to: Stipend Admin → Company Settings → ADP Settings
Click Configure Payroll Codes.
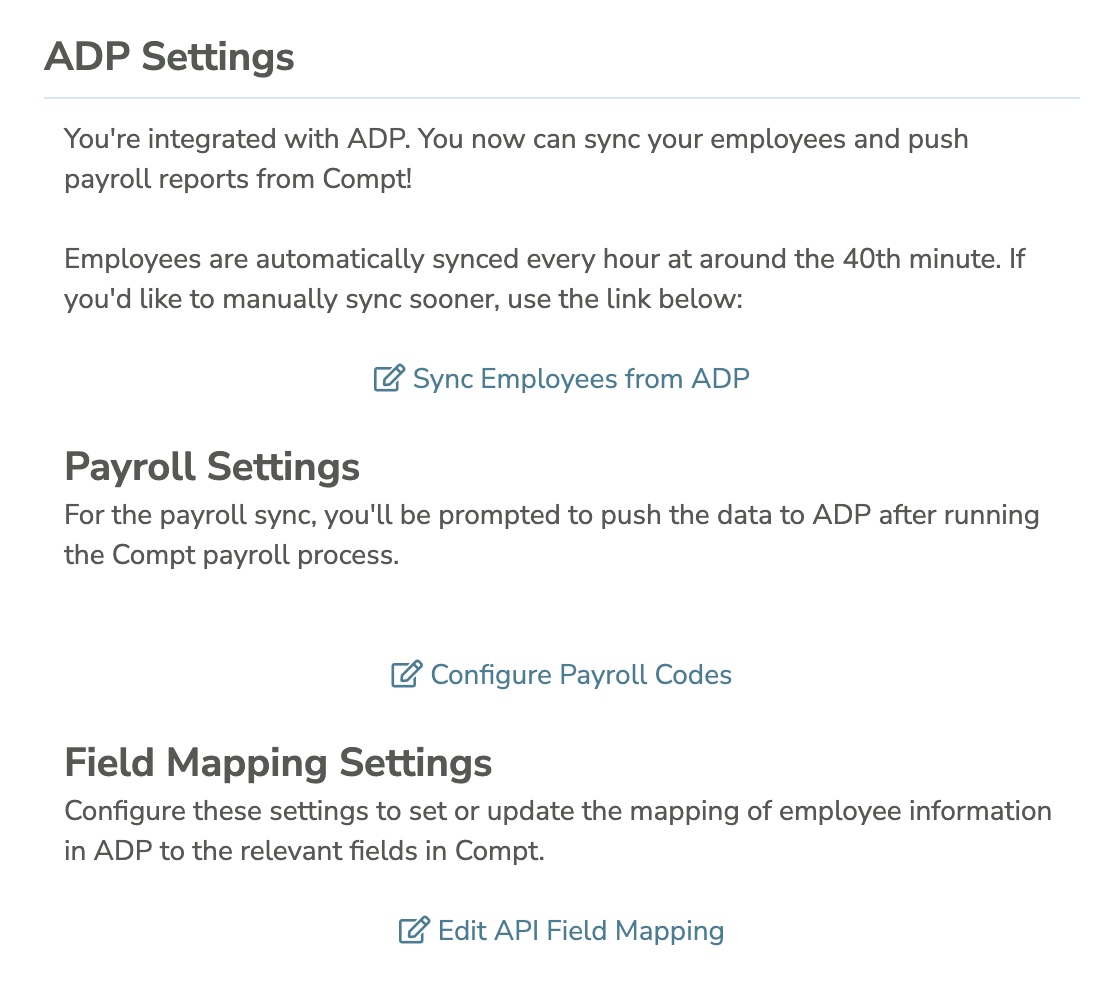
3. Click ReSync Groups and Payroll Codes so Compt can pull your available ADP pay codes.
Once synced, use the dropdowns to:
- Select your Taxable pay code
-
Select your Non-Taxable pay code

- Click Save Changes.
- At this point, pay code mapping between Compt and ADP Workforce Now is complete. You have successfully set up pay code mapping between Compt and ADP Workforce Now!


Step 6: Push Payroll from Compt to ADP Workforce Now
After running payroll in Compt, you can push pay data to ADP.
- In Compt, go to the Payroll page.
- Run payroll in Compt (if you haven't done so already)
- Click the Payroll Date for the payroll run you want to push.
-
Click Push to ADP.


Important: You must have an open payroll in ADP Workforce Now before pushing data from Compt. If payroll is not open in ADP, the push will fail.
After the push
-
Click View ADP Push Results to review details


- Log into ADP Workforce Now and navigate to: Process → Paydata
- Locate the paydata batch starting with
COMPT_ - Review and validate the paydata so it’s included in the ADP payroll run


That completes the setup for integrating ADP Workforce Now with Compt. If you have any questions or need assistance, feel free to reach out to your Customer Success Manager or email support@compt.io. We’re happy to help!